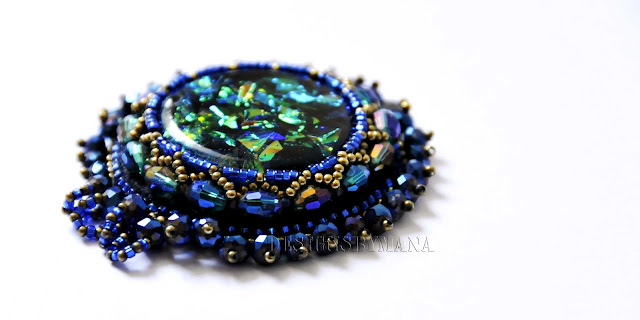
I have finally been able to get my hands on pictures of my
earlier pieces. Earlier this year my mom came to stay with me for a while to
take care of me while I was recovering from surgery and any piece I made during
that time that she expressed any interest in I would give to her, so I don’t
have access to them with us living on two different continents and all.
But I was able to convince my photographer friend, Sanaz, to
take pictures of the pieces saying it would be good practice for her as well: D
Before I started doing beading I went through a resin and
clay phase. After starting bead embroidery I started using clay and resin for
making cabochon. I decided early on against clay cabochon as I just didn’t like
the effect and glazing them was such a messy process that I gave up, but resin
I like, except for the wait time.
Before I started putting pictures in resin, I started with
glitter and then moved on to making these faux dichroic pieces. Dichroic glass pieces are very
beautiful but I haven’t been able to find them anywhere in shops. I am a bit
hesitant to order these types of patterned cabochon online because the pieces
are very different from each other, the picture on the website can be nothing
like what you will end up getting. For this sort of cabochon I would rather buy
them in person to choose the ones I like. Since I couldn’t find any I made the
resin version.
The concept of this piece was to practice the bezel work
around the cabochon. After gluing the resin cabochon on I sewed on a row of
glass beads with a seed bead in between each in order to allow for me to pass
the needle through for the next step, which was adding the gold seed beads. I
added 7 size 15/0 seed beads onto my needle and went through each of the size
11/0 seed beads I had sewn in between the larger glass beads. After this stage
was finished all that was left to do was to close the work, which was done by
putting 4 size 15/0 seed beads on to the needle and sewing through the middle
gold seed bead, and pull tight.
Had I not run out of pin backs this piece was destined to
become another brooch but since I had, it was decided it would be best if I
made this into a necklace.
I didn’t have any necklace making components such as clasps
and other things so this had to be something I could slide on a chain or ribbon
or cord.
I made some loops on the top to allow for a cord or chain to
go through and finished off the edge by doing a picot type edge while using a
larger rondelle bead rather than just seed beads.
LIST OF MATERIALS USED:
- 3x6 FACETED OVAL GLASS AQUA
- 3x4MM FACETED RONDELLE SAPPHIRE GLASS BEADS
- TRANSPARENT SAPPHIRE SEED BEADS SIZE 15/0
- GOLD METAL ROUND SEED BEADS SIZE 15/0
- FIRELINE THREAD 0.006” IN SMOKE GREY
- LACY'S STIFF STUFF
- BLACK ULTRASUEDE
- E-6000 GLUE


Can I ask you what you used for the actual resin cab? I am doing the same and am not a big internet buyer. I have found iridescent papers (cellophane)in various stores and have been using that which actually has turned out nice but I can't find many colors... I also haven't backed mine with anything dark but using foil paper or nothing at all. Stilla nice effect but would love to get a rainbow-y effect as yours has.
ReplyDeleteThx!
hi sorry it took me a while to get back to you, for some reason i never get emails when i get comments so i apologize for being late in replying . i use normal resin you can get from craft stores with different cellophane papers mixed in for these cabs. and then once its set i pour a thin layer of black resin so the colours pop even more, if you want a more detailed explanation look up this video:http://www.youtube.com/watch?v=IQQFofng9CY this is how i learnt to make them. but since i couldnt find cellophane anywhere i ordered the kit from their website but if you don't like online shopping then party stores is the best bet for finding different colour cellophane , hope this helps , if you need any more help please let me know!
ReplyDelete